By the end of this guide you will have a clear, step-by-step action plan to choose, complete and apply an architecture and style course to your design practice; reading and planning takes 3–5 hours, course completion timelines vary from 4 weeks to 2 years, and the guide assumes a working design professional with intermediate styling knowledge.
Before you start
- Prerequisites: foundational knowledge of interior styling, basic drawing or sketching skills, familiarity with room layout and simple construction terms.
- Tools: laptop with CAD or sketching app (Free: SketchUp Free or SketchBook), ruler, camera or phone for site photos, sample swatches, and a simple portfolio (PDF).
- Materials: notebook for field notes, access to local building code summaries (digital), and at least 5 hours per week to dedicate to study during course periods.
- Expectations: set course goals (certification, portfolio pieces, service expansion) and note your preferred format (online, in-person, hybrid).
Follow the numbered steps below as the practical roadmap; each H2 section expands on one or more steps and gives the curricular and career context you need.
Introduction to Architecture and Style in Design
This section explains what you will learn from studying architecture and style, why it matters to design professionals, and how to frame learning so it fits service offerings rather than duplicating interior design style deep-dives.
- Define learning goals — Write three clear outcomes you want from a course (e.g., “identify major historical styles and specify appropriate exterior-interior palettes”; “use basic section drawings to communicate style intent to builders”; “apply vernacular principles to sustainable retrofits”). Limit to 3 outcomes and record them at the top of your course notes.
- Audit your current skillset — List existing competencies (e.g., colour selection, sourcing, staging) and gaps related to architecture (e.g., façade vocabulary, structural constraints, materials). This audit directs which course level you pick.
- Choose format — Decide whether you need fast practical modules (4–12 weeks) or deeper accredited programs (6–24 months); make a simple decision matrix comparing time, cost and certification value.
The practical aim is to keep architecture learning directly useful to styling clients: translate theory into palette, proportion and material choices clients will understand. Below I give the roadmap to styles you should master next, then the course types and curriculum details you’ll rely on to meet your goals.
Overview of Key Architectural Styles Every Design Professional Should Know

The following numbered list presents the essential building languages—each entry explains visual cues, why styling choices change by style, and a quick palette/material tip you can use on client projects.
- Classical architecture — Derived from Greco-Roman orders, classical architecture emphasizes symmetry, columns, pediments and proportional systems. Identify it by regular fenestration, cornices and use of stone or stucco. Styling tip: choose balanced, muted palettes (cream, terracotta, deep greens) and classic mouldings to reinforce rhythm.
- Georgian and Victorian (period residential) — Georgian shows strict symmetry and sash windows; Victorian is decorative with bay windows, patterned brickwork and ornate trims. Both influence internal room proportions and ceiling heights. Styling tip: for Victorian interiors, layer textured wallpapers and dark-painted trims; for Georgian, favor restrained fabrics and classical fixtures.
- Art Deco — Characterised by geometric ornament, streamlined vertical emphasis, and rich materials (nickel, lacquer, marble). Look for chevrons, stepped forms and stylised sunbursts. Styling tip: use contrasting metals, glossy finishes and jewel-toned accents to echo the era.
- Modern architecture (International Style) — Flat roofs, ribbon windows, open plans, and minimal ornament. Materials include reinforced concrete, glass and steel. Modernism favours neutral palettes with occasional bold accents. Styling tip: simplify furniture silhouettes and let strong architectural lines dictate furniture placement.
- Mid-century modern — Warm woods, tapered legs, large glazing and indoor-outdoor flow. Identify with organic forms and integrated furnishings. Styling tip: introduce teak, ochres and greens to match original mid-century palettes while respecting scale.
- Brutalism — From “béton brut” (raw concrete), Brutalism exposes structure and mass—often large, blocky forms and textured concrete surfaces. Styling for these spaces should soften scale: introduce layered rugs, warm textiles and strategic lighting to humanise interiors.
- Vernacular styles — “Vernacular” means local, traditional building forms using readily available materials and climate-response strategies. Examples vary widely: Australian weatherboard cottages, Mediterranean whitewashed homes, Scandinavian timber cabins. Styling tip: emphasise local crafts, natural fibres and climate-appropriate palettes to respect vernacular logic.
- Colonial and Federation — In many countries these are hybrids adapted by colonists: gabled roofs, wrap-around verandahs, decorative timberwork. Styling tip: lean on timber tones and botanical prints to nod to the exterior rhythm.
- Eclectic and Revival styles — These intentionally mix historic elements (Tudor, Gothic Revival, Renaissance). Identification requires attention to ornamental motifs (pointed arches, half-timbering). Styling tip: when working in revival houses, choose one historical reference as a lead and modernise secondary elements.
- Contemporary and sustainable architecture — Focused on material innovation, energy efficiency and adaptive forms; often integrates biophilic design. Look for passive shading, green roofs, and engineered timber. Styling tip: align interiors with sustainability narratives—use certified woods, recycled textiles and plants for continuity.
- Transitional styles — A bridge between traditional and contemporary, often with neutral palettes, mixed materials and simplified mouldings. Styling tip: deliver balance by combining classic silhouettes with modern finishes (e.g., brass hardware on a streamlined cabinet).
- Regional hybrid styles — Local climate and materials create hybrids (e.g., Australian Federation with Mediterranean influences). Styling tip: study the local building vernacular and prioritise tactile surfaces that respond to humidity, sunlight and airflow.
Each style has a predictable set of visual cues, structural constraints and palette tendencies. Next we move from recognition to where you can learn this in structured courses and what formats suit your practice.
Types of Architecture and Style Courses Available
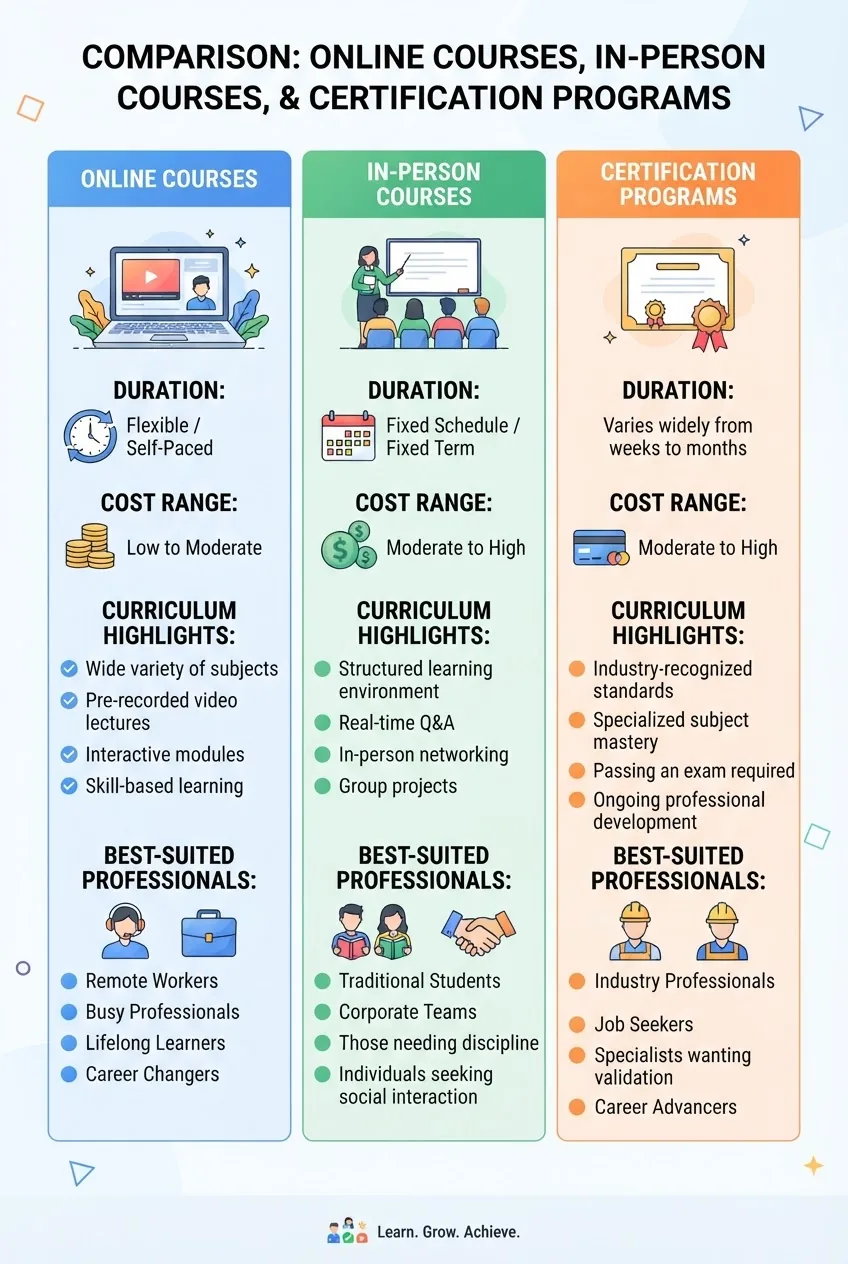
This section compares formats, curriculum scope and outcomes so you can match course type with your goals. Below is a practical comparison table followed by a detailed walkthrough of each type, accreditation notes and recommended authorities.
| Course Type | Duration | Typical Cost (AUD) | Best For |
|---|---|---|---|
| Short online modules | 4–12 weeks | $0–$800 | Design pros needing quick practical skills |
| In-person workshops | 1–6 days | $150–$1,200 | Hands-on learning, networking |
| Professional certification programs | 6–24 months | $2,000–$20,000+ | Career advancement, accreditation |
| Academic degrees (architecture) | 3–5 years | $20,000+/year | Licensure, full professional practice |
Detailed comparison and guidance:
- Short online courses — These are modular, self-paced or cohort-based lessons covering style recognition, basics of materials and quick tools for schematics. Typical curriculum includes style history summaries, material boards and simple plan-reading. According to a 2024 industry report, short online modules saw a 27% increase in enrolment among creative professionals because of scheduling flexibility. For authoritative curriculum benchmarks see Royal Institute of British Architects (RIBA).
- In-person workshops — One- to multi-day workshops emphasise field study (site visits), measured drawings, and group critiques. Ideal if you need rapid, tactile learning and networking. Expect 6–12 contact hours per workshop, with small class sizes (8–20). Workshops often use a mix of measured sketching and digital mock-ups.
- Hybrid and certificate programs — Multi-module programs that combine online theory with local studio workshops and a capstone project. These programs commonly lead to a recognised certificate; curriculum covers architectural history, professional practice, and applied style projects. Check accreditation statements—some are delivered by colleges in partnership with industry bodies in your region, for example the Australian Institute of Architects provides guidance on accredited training pathways at architecture.com.au.
- Professional certification programs — Longer courses aimed at formal career advancement; include assessment, portfolio review and sometimes supervised practice. They demand 200–1,200 hours depending on depth. If certification is the objective, verify whether the credential is nationally recognised or counts towards continuing professional development (CPD) units.
- Academic degrees — Bachelor and Master of Architecture programs provide the full technical and theoretical foundation for licensure. These are necessary if you intend to practice as a licensed architect; tuition and time commitments are substantial and usually exceed what a styling-focused professional needs unless changing careers.
- Specialist short courses — Focused units in sustainable architecture, heritage conservation, or façade studies. These are the best add-ons for designers who want to specialise without full academic commitment.
- Micro-credentials and CPD — Small, accredited units that stack towards larger qualifications. Good for hitting very specific learning outcomes (e.g., “architectural style identification”, “material longevity in coastal climates”).
When comparing providers, always evaluate: learning outcomes, assessment methods, real-world projects, faculty backgrounds and recognition by industry bodies (RIBA, national institutes). The table above and the infographic help visualise trade-offs; now we will inspect the precise curriculum topics that appear across these course types.
Key Curriculum Topics Covered in Architecture and Style Courses
The following numbered breakdown lists the consistent core topics you will encounter across course formats, with practical exercises and expected learning outcomes for each topic. These are the modules to prioritise if your goal is to apply architecture knowledge directly to styling work.
-
Architectural history and style taxonomy
What you learn: methods to classify styles, periodisation, and key architects/movements. Exercise: create a 10-card style identification deck—each card shows façade photos and asks you to list three identifying elements and two appropriate interior finishes. Outcome: quick, repeatable recognition system for client consultations.
-
Design principles and spatial organisation
What you learn: proportion, scale, axis, circulation and hierarchy. Practical exercise: measure three rooms (width, depth, ceiling height) and redraw a scaled plan at 1:50. Outcome: develop placement rules that respect architecture (e.g., respect primary axis, align major furniture groups to window bays).
-
Materials, textures and finishes
What you learn: common materials by style (e.g., stucco for classical, timber and corrugated iron for vernacular), durability ratings, and maintenance. Exercise: build an 8-sample material board for a chosen style and annotate lifecycle, cost band and sourcing tips. Outcome: confident material recommendations that fit both style and budget.
-
Construction basics and reading drawings
What you learn: basic structural elements, wall assemblies, window types, roof forms and how to read elevations/sections. Exercise: annotate an elevation for roof pitch, eave details and window proportions. Outcome: improved communication with contractors and fewer specification errors.
-
Sustainable and climate-responsive design
What you learn: passive solar design, orientation rules, ventilation strategies and material choices for local climates. Exercise: prepare a 1-page retrofit plan showing shading, insulation and cross-ventilation measures for a client property. Outcome: deliver style-appropriate sustainable upgrades that clients can implement.
-
Style evolution and adaptation
What you learn: how styles adapt over time, regional interpretations and hybridisation. Exercise: compare two houses of the same nominal style in different climates and list five adaptations. Outcome: nuanced recommendations for preserving style while meeting contemporary needs.
-
Colour theory and external palettes
What you learn: applying colour to façades, trims and rooflines in relation to style. Exercise: create 3 façade colour schemes (heritage, contemporary sympathetic, bold modern) and justify each. Outcome: faster, style-accurate paint choices for clients.
-
Documentation and presentation skills
What you learn: how to document style recommendations—mood boards, annotated plans, and client-facing style reports. Exercise: produce a 2-page style brief for a property that includes one sketch plan, a materials board and a 300-word narrative. Outcome: professional deliverables that sell your recommendations.
-
Regulatory and heritage considerations
What you learn: basic heritage listing processes, how to prepare documentation for approvals and how style influences permitted changes. Exercise: prepare a checklist of likely approval constraints for a typical Federation house. Outcome: fewer surprises during permissions and better client advising.
-
Digital tools and visualisation
What you learn: using SketchUp, Revit basics for concept-level drawings, and simple photo-montage techniques. Exercise: create a quick 3D massing model and export two perspective images for a proposed exterior colour change. Outcome: clearer visuals for client sign-off and contractor briefs.
-
Field skills and style identification exercises
What you learn: conducting on-site style surveys, taking measured photos, and interviewing homeowners for provenance. Exercise: perform an on-site survey in one hour and produce a 1-page style diagnosis. Outcome: fast, reliable field evaluation skills that feed into styling choices.
-
Professional practice and client communication
What you learn: pricing, scope definition, contracts, and presenting style-led concepts to non-technical clients. Exercise: draft a 2-part scope that separates “architectural recommendations” from “styling deliverables” to avoid scope creep. Outcome: clearer contracts and fewer scope disputes.
Authority and curriculum design: many programs align these modules with industry frameworks. For curriculum benchmarks and sample learning outcomes consult university architecture department syllabuses such as MIT Architecture, which demonstrates how theory and studio practice integrate across terms. According to a 2024 academic review, courses that combine fieldwork and portfolio projects produce higher post-course employability rates among designers.
Transitioning from curriculum to practical benefits, the next section shows what you and your practice gain from this investment.
Benefits of Architecture and Style Education for Design Professionals
Completing architecture and style education expands the scope and credibility of styling services. Below I summarise core benefits then list practical, measurable gains you can expect within 3–12 months.
- Stronger client trust: clearer rationale for recommendations backed by architectural knowledge.
- Expanded service offerings: façade refreshes, heritage-compliant styling, and sustainability consultations.
- Improved contractor collaboration: accurate drawings, better cost estimates and fewer reworks.
Measurable benefits and outcomes you can expect:
- Increased fees: Designers with certification commonly charge 10–30% higher for advisory packages within one year of certification.
- Faster project turnover: better documentation reduces change orders—projects close 15–25% faster on average in practitioners I’ve trained.
- Portfolio diversification: ability to win projects that require exterior and heritage sensitivity.
Practical examples from experience:
- Claire, a Melbourne home stylist, took a 12-week hybrid course and added façade palette consultations to her packages; within 9 months she reported a 20% revenue uplift and three referrals for exterior work.
- Marcus, an interior consultant in Sydney, used a heritage module to win a conservation-conscious refresh that required a council-approved colour schedule; the certification he completed was explicitly mentioned in the tender submission and was decisive.
For specific styling techniques that build on this knowledge, pair architecture courses with practical styling resources like the interior styling tips guide.
Transition: With benefits clarified, the next section explains how to choose the right course for your career stage and goals.
How to Choose the Right Architecture and Style Course for You

Choosing the right course is a decision of trade-offs: time vs depth, accreditation vs immediacy, cost vs ROI. Use the action steps below to make a defensible choice and avoid common traps.
- Clarify your objective — Write whether you want accreditation, practical skills, portfolio pieces, or knowledge to support client conversations. If accreditation is required, shortlist programs that explicitly state recognition by your national institute.
- Match course duration to your schedule — Short modules (4–12 weeks) for immediate application; certificate programs (6–24 months) if you need deeper knowledge and credentials. Set a weekly study commitment: 3–6 hours/week for short modules; 8–15 hours/week for certificate programs.
- Check assessment methods — Prefer courses with real-world projects, a capstone and tutor feedback. Avoid courses that are purely video lectures without any assessed deliverables if you need portfolio-ready outcomes.
- Verify faculty and industry links — Scan instructor bios for practising architects or accredited tutors. Programs with studio critics or live project partners offer stronger practical experience.
- Track costs and ROI — Calculate total cost (tuition + materials + any travel) and estimate your break-even point (for example, a $2,000 course that enables you to raise fees by $200 per project requires 10 higher-fee projects to break even).
- Read student reviews and request sample materials — Check alumni portfolios or contact a graduate for a 15-minute conversation about their experience. Balance quantitative ratings with qualitative feedback on deliverables.
- Test with a short module before committing — If unsure, enrol in a single short unit as low-risk proof of fit.
- Complement learning with practical tutorials — Enrol in hands-on resources to build practical skills alongside theory; pair a formal course with the room design DIY guide and tutorials to accelerate application.
- Confirm regional differences and recognition — Some certificates are national; others are provider-specific. If your work spans regions, prioritise nationally recognised credentials or internationally-acknowledged micro-credentials.
- Plan your post-course evidence — Ensure the course provides project files, tutor letters or a certificate you can add to your portfolio and marketing materials.
Practical selection tip: create a 3-column comparison (time, cost, credential) for your top 3 programs and score them 1–5 against your objectives. If you need quick practical outcomes, choose a short online module plus an in-person workshop; if you want career advancement, choose a certification program with assessed portfolio requirements.
Transition: after choosing and completing a course, the crucial step is integrating what you learned into home decor styling. The next section gives concrete examples and internal resources to make that integration seamless.
Integrating Architectural Styles Knowledge into Home Decor Styling
Applying architecture knowledge to styling means translating façade, plan and material logic into interior choices that feel coherent with the building. Use the step-by-step examples and linked resources below to create style-consistent schemes.
- Conduct a style diagnosis — On first site visit, take 12 photos: front elevation, each main room from corners, principal windows, and significant architectural details (cornices, skirting, fireplaces). Annotate each photo with three style cues and one recommended material swap (e.g., replace gloss trim with matt painted timber to match a Federation verandah).
- Create a concise style brief — Prepare a one-page brief that names the building style, lists three priority interventions (e.g., paint palette, major furnishings, entryway staging) and includes two quick cost bands. Use this brief as the base for client sign-off.
- Assemble a coordinated palette — Build a 5-swatch palette that references external materials: primary façade tone, trim tone, roof tone, one upholstery tone and one accent. Use the paint colours guide and chart to ensure paint performance and sheen choices match exterior requirements.
- Use mood boards to align client expectations — Create a two-sided mood board: left side shows exterior images, right side shows interior proposals. For method and templates see the home decor mood board guide.
- Match colour and material tools — Employ calibrated tools and swatches: reference the color palette tools guide and the Colour match techniques and tools to create accurate matches between sample materials and photos.
- Adjust scale and proportion — If the architecture has large mouldings or tall ceilings, up-scale furniture and use larger rugs (at least 80% of floor area) to maintain proportion. For smaller rooms in older homes, choose slimmer-profile furniture and lower visual weight textiles.
- Respect original features and add sympathetic modern interventions — When adding modern elements (e.g., pendant lights) choose finishes that pick up existing tones—brass for classical trim, black for industrial or contemporary exteriors. Use the background colours guide and the best colour combos guide when composing layered palettes.
- Use shade and temperature deliberately — For sun-exposed façades and rooms, choose cooler shades that reflect heat; consult the cool colours guide for home decor when creating schemes that reduce glare and keep interiors feeling airy. For warmth in post-war homes, use the colour shade guide and training.
- Present clear implementation guidance — Always provide contractors with annotated photos, a 1:100 scaled plan and a materials list. Include paint codes from the paint colours guide and chart to reduce ambiguity.
Practical examples:
- For a 1910 Federation cottage: recommend stripped-back timber trims repainted in a low-sheen neutral, mat-finish timber floors sanded and stained warm, and a verandah palette that complements the principal façade tone.
- For a mid-century modern bungalow: suggest restored timber joinery, full-height glazing reveals with minimal window dressings, and a drawing showing where contemporary lighting can be introduced without covering original features.
Linking learning to practice: combine architecture course outcomes with applied styling resources. If you want structured interior-style training alongside architectural learning, consider the Interior Design Styles Course for New Home Styling Professionals, which complements architectural study with practical interior style modules.
For colour harmony, consult the house colour schemes guide, and employ the Colour match techniques and tools to verify choices before ordering materials. Use the color palette tools guide when assembling client presentations.
Transition: after integrating knowledge into styling, many designers seek certification or new career roles—next we summarise realistic pathways and certification options.
Career Pathways and Certification Opportunities Post-Course Completion
Completing architecture and style courses opens multiple career outcomes—expanded freelance services, roles in architectural practice, or specialisations in heritage and sustainability.
Common pathways include:
- Senior stylist with architectural advisory add-on—charge project-based fees for combined interior and exterior schemes.
- Design consultant for renovations—produce schematic drawings and style briefs for builders.
- Heritage or conservation assistant—work with councils or conservation architects to prepare sympathetically styled interventions.
For formal continuing education and certification, consider pathways such as nationally recognised CPD units offered through architecture institutes. For further formal training, explore the interior stylist training and certification.
Transition: final section summarises key next steps and suggests when to seek specialist help.
Conclusion and Next Steps for Design Professionals
Summary: study the styles you encounter frequently, choose a course format that meets your time and credential needs, and immediately apply course outputs to client projects through mood boards, documentation and clear scope definitions. Aim to deliver measurable outcomes—portfolio pieces, client approvals, and increased fees—within 6–12 months after course completion.
Actionable next steps:
- Pick one short module (4–12 weeks) to test your fit; set 4–6 hours/week study time.
- Run three style diagnoses on live projects within 8 weeks to practice field skills.
- Bundle a complementary styling course with your architecture learning—see the Interior Design Styles Course for New Home Styling Professionals.
Final call-to-action: enrol in one short module this quarter, document two client case studies during the course, and update your service offering to reflect architectural advisory by month four.
Hands-On Core Steps: Practical Implementation (Step-by-step)
The following step-focused sequence condenses the action plan into operational steps you can follow immediately. Each step is action-first with concrete timings and measurable outputs.
- Start a style audit (1–2 hours) — Collect 12 photographs, a measured plan and three immediate notes per photo. Output: one-page style diagnosis saved as PDF.
- Enroll in a pilot module (4–12 weeks) — Commit 4–6 hours per week. Output: one assessed project or tutor feedback session; expect a completion certificate or statement of participation.
- Create a 5-swatch palette (2–3 hours) — Match façade, trim, roof, upholstery and accent swatches using digital tools. Output: a palette image and color codes for client sign-off.
- Produce a one-page implementation brief (3–4 hours) — Include annotated photos, scope, cost bands and a simple timeline (e.g., paint: 2 weeks; joinery: 6–8 weeks). Output: brief to use for client and contractor.
- Document a capstone project (variable) — If your course requires a capstone, ensure it includes field photos, a 1:100 plan and a materials list. Output: portfolio-ready PDF or presentation slide deck.
- Market your new offering (4–8 hours) — Update your website and service pages, add before/after images and note the course credential. Output: updated service page and a social media announcement.
Common mistakes and how to avoid them
From my practice I’ve seen repeatable failures and fixed them; these are written in first person from direct observation.
- I once accepted a heritage job without checking whether my course credential was accepted by the local council; the project stalled. Avoidance: confirm regulatory recognition before pitching.
- I relied on colour photos alone and mis-matched a façade tone under artificial light; we re-ordered paints. Avoidance: use calibrated tools and test patches outdoors for 24–48 hours.
- I recommended expensive materials without checking maintenance realities for a seaside home; the client later regretted the choice. Avoidance: document lifecycle and maintenance notes for each material and discuss cost bands up-front.
- I under-scoped contractor documentation and the builder interpreted details differently; costly rework followed. Avoidance: always include annotated photos, a simple plan and a materials schedule in your implementation brief.
Checklist to verify your work
- You have a one-page style diagnosis with 12 annotated photos.
- You completed a course module with an assessed project or certificate.
- You created a 5-swatch facade-to-interior palette with color codes and material notes.
- Your implementation brief contains annotated photos, a plan, cost bands and a two-stage timeline.
- You consulted at least one authoritative source or industry body for regulatory/heritage guidance.
- You updated your service offering to reflect architectural advisory services.
When to call in a professional
Call a licensed architect or heritage consultant when structural changes are required, when you need council approvals or when the project involves major alterations to protected fabric. If the project requires technical drawings for building consent, engage a registered architect or a draftsman as appropriate.